
IAT - Intake Air Temperature Sensor
Intake Air Temperature Sensor(IAT)
OPERATIONThe Intake Air Temperature (IAT) sensor resistance changes in response to the intake air temperature. The sensor resistance decreases as the surrounding air temperature increases. This provides a signal to the PCM, indicating the temperature of the incoming air charge. The following symptoms can be caused by a faulty IAT sensor due to loose connections, bad grounds, high resistance in the circuit, or opens in the circuit.
IAT Sensor Symptoms
- Extended crank time when the engine is cold
- Poor fuel economy
- Spark knock
Intake Air Temperature Sensor Testing
Turn the ignition switch OFF before testing the sensor.
- Disengage the wiring harness connector from the IAT sensor.
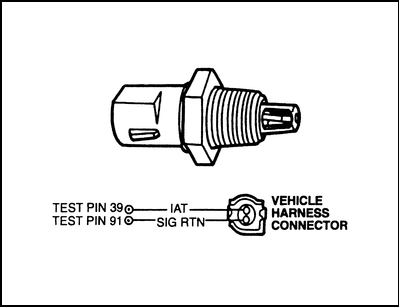
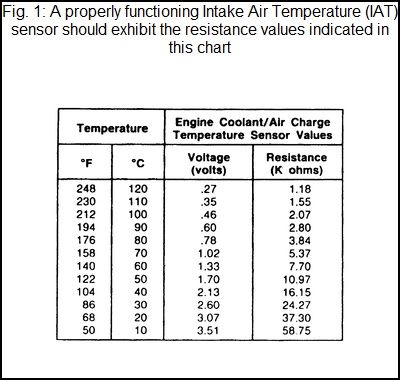
- Using a Digital Volt-Ohmmeter (DVOM), measure the resistance between the two sensor terminals. Intake Air Temperature (IAT) sensor connector terminal identification — 1994–96 models
- Compare the resistance reading with the accompanying chart. If the reading for a given temperature is approximately that shown in the table, the IAT sensor is okay.
- Attach the wiring harness connector to the sensor.
Intake Air Temperature Sensor Replacement
REMOVAL & INSTALLATION- Disconnect the negative battery cable.
- Disengage the wiring harness connector from the IAT sensor.
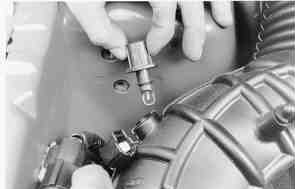
- Remove the sensor from the air cleaner outlet tube. To remove the IAT sensor, detach the wiring harness connector from it . . .
-
To install:
- Wipe down the air cleaner outlet tube and IAT sensor mounting boss to clean the sensor area of all dirt and grime.
- Install the sensor into the air cleaner outlet tube securely.
- Attach the wiring harness connector to the IAT sensor.
- Connect the negative battery cable.

Car Engine Sensors :
- Powertrain Control Module (PCM)
- Throttle Position (TP) sensor
- Mass Air Flow (MAF) sensor
- Intake Air Temperature (IAT) sensor
- Idle Air Control (IAC) valve
- Engine Coolant Temperature (ECT)
- Heated Oxygen Sensor (HO2S)
- Camshaft Position (CMP) sensor
- Knock Sensor (KS)
- Vehicle Speed Sensor (VSS)
- Crankshaft Position (CKP) sensor
- Engine Trouble Codes
