Changed rear rotors and brakes and now wheel won’t spin in reverse. Parking brake is engaged in reverse. Replaced all springs/hardware on parking brakes and used PBBlaster to make sure the cable wasn’t getting hung up. Tried to drive the car several times and parking brake is definitely on in reverse. Adjusted the adjustment wheel so that the brakes are compacted as much as can be and the hub spins fine forward but stops immediately when spun in reverse. I even put the old rotors back on thinking that would solve it however still acts the same. In the end, by taking out the adjustment wheel spreader the car works, however I have no parking brake and it will not pass state inspection this month without it. I’m at a loss and feel as if I’ve tried everything.
This may sound odd to you but I have seen this once before. It turned out the brake shoes were install improperly. Let me see if I can describe what was going on. The brake shoe material is a different size for two of them. The actual external shoe (metal part) is the same on all four per say. But there are two that the shoe material is shorter then the other. Looking at just one side with two short shoes or one side with two longer shoes would be hard to notice. And the difference if difficult to notice at all until you set one directly on top of the other for comparison. This would be what I would recommend you check first.
Parking Brake Shoes Replacement
Removal
1. Remove rear wheel and tire assembly.
2. Remove mounting bolts, then separate rear disc brake caliper assembly. Use wire or an equivalent tool to keep brake caliper from hanging down by flexible hose.
3. Remove parking brake shoe adjusting hole plug.
4. Remove rear disc brake rotor.
5. Remove No. 3 parking brake shoe return tension spring.
6. Remove No. 1 parking brake shoe return tension spring.
7. Remove parking brake shoe hold down spring cup and parking brake shoe hold down spring to separate No. 1 parking brake shoe assembly from backing plate.
8. Remove parking brake shoe lever strut and parking brake shoe strut compression spring.
9. Remove parking brake shoe hold down spring cup and parking brake shoe hold down spring to separate No. 2 parking brake shoe assembly from backing plate.
10. Remove parking brake shoe adjusting screw set.
11. Separate No. 2 parking brake shoe return tension spring to remove No. 1 parking brake shoe assembly.
12. Separate No. 3 parking brake cable assembly from parking brake shoe lever with needle-nose pliers.
13. Remove C-washer, shim and parking brake shoe lever from No. 2 parking brake shoe.
14. Remove parking brake shoe guide plate set bolt and parking brake shoe guide plate.
15. Remove parking brake shoe hold down spring pins.
Inspection
1. Measure inside diameter of disc brake rotor with a brake drum gauge or an equivalent tool.
2. If inside diameter is more than maximum, replace rear disc.
3. Measure thickness of parking brake shoe lining.
4. If lining thickness is less than minimum, or if there is severe or uneven wear, replace parking brake shoe assembly.
5. Apply chalk to inside surface of disc brake rotor, then grind down brake shoe lining to fit disc.
6. If contact between disc brake rotor and brake shoe lining is incorrect, repair it with a brake shoe grinder or replace parking brake shoe assembly.
7. Always replace both parking brake shoes together.
Installation
1. Install parking brake shoe hold down spring pins.
2. Apply adhesive to threads of parking brake shoe guide plate set bolt.
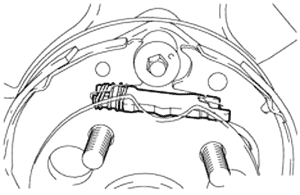
3. Install parking brake shoe guide plate and parking brake shoe guide plate set bolt, Fig. 10.Torque bolt to 13 ft. lbs.
4. Apply high temperature grease to areas of backing plate which make contact with shoe.
5. Apply high temperature grease to areas of parking brake shoe lever which make contact with No. 2 parking brake shoe assembly.
6. Install parking brake shoe lever and shim to No. 2 parking brake shoe assembly with a new C-washer,
7. Measure clearance between No. 2 parking brake shoe assembly and parking brake shoe lever, Fig. 17. If clearance is not as specified, replace shim with one of appropriate size.
8. Connect No. 3 parking brake cable assembly to parking brake shoe lever.
9. Install No. 2 parking brake shoe return tension spring to No. 2 parking brake shoe assembly.
10. Apply high temperature grease to parking brake shoe adjusting screw set threads.
11. Install parking brake shoe adjusting screw set.
12. Install No. 2 parking brake shoe assembly to backing plate with parking brake shoe hold down spring cup and parking brake shoe hold down spring.
13. Install parking brake shoe lever strut and parking brake shoe strut compression spring.
14. Install parking brake shoe assembly to backing plate with parking brake shoe hold down spring cup and parking brake shoe hold down spring.
15. Install No. 1 parking brake shoe return tension spring.
16. Install No. 1 parking brake shoe return tension spring.
17. Install No. 3 parking brake shoe return tension spring.
18. Verify that each component is installed properly.
19. Install rear disc brake rotor.
20. Install parking brake shoe adjusting hole plug.
21. Install rear disc brake caliper and mounting bolts. Torque bolts to 65 ft. lbs.
22. Install rear wheel and tire assembly. Torque hub nuts to 76 ft. lbs.
23. Bed in parking brake shoes to discs as follows:
a. Drive vehicle at about 31 mph on a safe, level and dry road.
b. Depress parking brake pedal with 33.7 lbs. of force.
I missed the grease! Once applied, all worked perfectly.
That’s awesome! Thanks for letting us all know.
Comments are closed.