
Automotive Engine Repair
Automotive Engine Repair can become second nature with the right tools and skill set. Start learning now.
Engine Cooling System
Engine Sensors
Engine Ignition System
Engine Compression Test
Engine Overheating
Engine Starting System
Engine Charging System
Engine No Start
Engine Fuel Injector
Blown Engine Head Gasket
Engine Misfire
Remanufactured Engines
Choke Related Problems
Car Engine Symptoms
Leak Down Test
Engine repair Engine Rebuilding Videos
- Engines often take a big beating. That's partly because they tend to be used in rugged conditions. They may power a chain saw, a go-kart, a leaf blower, or a dirt bike. So they may be exposed to dirt that clogs their air filters and moisture that corrodes their parts. They may be subjected to sudden accelerations or may be kept running at peak power for longer periods than they were designed.
Here is all about the automobile engines that may help you to troubleshoot your problem or know more about your automotive engine.
- Troubleshoot and repair engine components and systems.
- Work with engines, ignition systems and electrical circuits.
- Inspect and repair small engine fuel systems.
- Disassemble and rebuild all types of small engines, including two-stroke, four - stroke, outboard, and riding mower engines.
More Categories
Car engine repair
Carburetor repair
Motorcycle engine repair
Small engine go kart
Truck engine repair
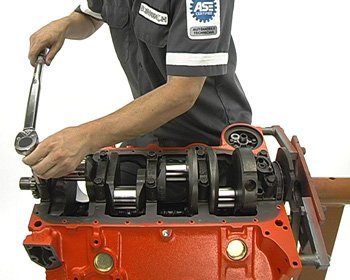
Install crankshaftSummary
The objective of this procedure is to show you how to install the crankshaft. The first step is to clean the block, bearings and crankshaft in preparation for the installation.Part 1. Preparation and safety
Objective
- Install the crankshaft.
Personal safety
Whenever you perform a task in the workshop you must use personal protective clothing and equipment that is appropriate for the task and which conforms to your local safety regulations and policies. Among other items, this may include:
- Work clothing - such as coveralls and steel-capped footwear
- Eye protection - such as safety glasses and face masks
- Ear protection - such as earmuffs and earplugs
- Hand protection - such as rubber gloves and barrier cream
- Respiratory equipment - such as face masks and valved respirators
If you are not certain what is appropriate or required, ask your supervisor.
Safety check
- Make sure that you understand and observe all legislative and personal safety procedures when carrying out the following tasks. If you are unsure of what these are, ask your supervisor.
Points to note
- Make sure all parts and components are clean prior to assembly.
- Ensure bearing oil holes line up with oil galleries.
- For all types of engines it's very important to put a dab of silicon sealer on each side of the seal where the rear cap meets the metal of the block. If you don't do this, oil will leak from the rear of the block because there is no gasket here.
- Have all the torque specifications for the engine on hand.
Part 2: Step-by-step instruction
- Clean and prepare
Clean the saddles of the block, and do the same to both sides of all the bearings to make sure there's no dust or build up from the previous lubricant. Clean the crankshaft itself as well.- Install bearings
Install the main bearings and double check that the oil holes line up with the ones in the block. At the same time, clean the caps and wipe and install the bearings for them as well.
When the motor starts up for the first time and while it's running, the crankshaft requires more lubrication than the camshaft. Engine assembly lubricant is better for the camshaft journals and lobes because it is specifically designed to provide the start up and break-in protection that high quality bearings deserve. Make sure you wipe some on the faces of the thrust bearing as well.- Install two-piece main seal
If the engine has a two-piece main seal, Install the upper half before lowering the crankshaft into place. On a neoprene rubber seal, the pointy lip must point towards the inside of the motor. When you press it into place use the plastic protector shim between the seal and the block to keep the rubber back of the seal from being damaged by the sharp edge of the block. For engines with an older type of rope seal, work the rope into the groove of the block and then use a large socket to tap it deeper into the groove. Cut off the excess flush with the block using a razor knife, or just clip it off with some cutting pliers. You can bolt the cap in upside down for some motors to install the rope seal in the rear cap. in either case, put a little oil or assembly lube on the lip or the rope so the seal won't burn out on start-up.
For all types of engines it's very important to put a dab of silicon sealer on each side of the seal where the rear cap meets the metal of the block. If you don't do this, oil will leak from the rear of the block because there is no gasket here. Spread a little on the tips of neoprene or rope seals as well.- Install crankshaft and caps
Be gentle as you lay the crankshaft in place. Then, lubricate each of the caps and put them in place. Each bolt that goes into the engine needs to have some type of lubricant on it's threads. The main cap bolts should have some engine oil on the threads to reach the proper torque setting. Make sure the bolts are threaded in a few turns then tap on the caps to seat them.
If you have rubber rear main seals, remember to use the protector shim on the seal when you put it in the rear main cap, and of course, rubber or rope seals get a bit of oil on the seal itself. The contact surfaces of the cap needs to be clean to seal correctly against the silicone on the block. Before the main cap bolts can be torqued, they should also have some oil put on the cap where the head of the bolt is going to contact it.
Make sure you have all the torque specifications for your engine readily available. You should be able to find what you need in the correct repair manual.
Carry out the final torquing of the main caps in three increments. Whatever the torque specification, tighten the bolts first to one third that amount, then two thirds, then again to final specification. If you have four bolt main caps, do the inner bolts first.
Leave the cap that has the thrust bearing in it to last. When the other caps are correctly tightened, hit the back of the crank with a rubber mallet or hammer on another hammer to line up and seat the thrust bearings. Now go through the three increments to torque the cap with the thrust bearings, inner bolts first if it's a four bolt cap.- Install one-piece main seal
For a one piece rear main seal, you need access to the rear of the block. This type of engine uses an adapter that bolts to the block. This way the rear main seal is fitted in after the adapter is sealed and bolted in place.
To install the seal, you will probably have to take the block out of the stand so that you have access to the rear area of the block, then lift the engine back onto the stand after installing the seal. You may be able to install the adapter while it is on the block if you can get it past the engine stand adapter. Alternatively, you can leave the main seal and install it later.
Engine Starting Problems
Gasoline Engines
Engine turns over, but will not start
- Check fuel level in fuel tank, add fuel if empty.
- Check battery condition and state of charge. If voltage and load test below specification, charge or replace battery.
- Check battery terminal and cable condition and tightness. Clean terminals and replace damaged, worn or corroded cables.
- Check fuel delivery system. If fuel is not reaching the fuel injectors, check for a loose electrical connector or defective fuse, relay or fuel pump and replace as necessary.
- Engine may have excessive wear or mechanical damage such as low cylinder cranking pressure, a broken camshaft drive system, insufficient valve clearance or bent valves.
- Check for fuel contamination such as water in the fuel. During winter months, the water may freeze and cause a fuel restriction. Adding a fuel additive may help, however the fuel system may require draining and purging with fresh fuel.
- Check for ignition system failure. Check for loose or shorted wires or damaged ignition system components. Check the spark plugs for excessive wear or incorrect electrode gap. If the problem is worse in wet weather, check for shorts between the spark plugs and the ignition coils.
- Check the engine management system for a failed sensor or control module.
Engine does not turn over when attempting to start
- Check the battery state of charge and condition. If the dash lights are not visible or very dim when turning the ignition key on, the battery has either failed internally or discharged, the battery cables are loose, excessively corroded or damaged, or the alternator has failed or internally shorted, discharging the battery. Charge or replace the battery, clean or replace the battery cables, and check the alternator output.
- Check the operation of the neutral safety switch. On automatic transmission vehicles, try starting the vehicle in both Park and Neutral. On manual transmission vehicles, depress the clutch pedal and attempt to start. On some vehicles, these switches can be adjusted. Make sure the switches or wire connectors are not loose or damaged. Replace or adjust the switches as necessary.
- Check the starter motor, starter solenoid or relay, and starter motor cables and wires. Check the ground from the engine to the chassis. Make sure the wires are not loose, damaged, or corroded. If battery voltage is present at the starter relay, try using a remote starter to start the vehicle for test purposes only. Replace any damaged or corroded cables, in addition to replacing any failed components.
- Check the engine for seizure. If the engine has not been started for a long period of time, internal parts such as the rings may have rusted to the cylinder walls. The engine may have suffered internal damage, or could be hydro-locked from ingesting water. Remove the spark plugs and carefully attempt to rotate the engine using a suitable breaker bar and socket on the crankshaft pulley. If the engine is resistant to moving, or moves slightly and then binds, do not force the engine any further before determining the problem.
Engine stalls immediately when started
- Check the ignition switch condition and operation. The electrical contacts in the run position may be worn or damaged. Try restarting the engine with all electrical accessories in the off position. Sometimes turning the key on an off will help in emergency situations, however once the switch has shown signs of failure, it should be replaced as soon as possible.
- Check for loose, corroded, damaged or shorted wires for the ignition system and repair or replace.
- Check for manifold vacuum leaks or vacuum hose leakage and repair or replace parts as necessary.
- Measure the fuel pump delivery volume and pressure. Low fuel pump pressure can also be noticed as a lack of power when accelerating. Make sure the fuel pump lines are not restricted. The fuel pump output is not adjustable and requires fuel pump replacement to repair.
- Check the engine fuel and ignition management system. Inspect the sensor wiring and electrical connectors. A dirty, loose or damaged sensor or control module wire can simulate a failed component.
- Check the exhaust system for internal restrictions.
Starter motor spins, but does not engage
- Check the starter motor for a seized or binding pinion gear.
- Remove the flywheel inspection plate and check for a damaged ring gear.
Engine is difficult to start when cold
- Check the battery condition, battery state of charge and starter motor current draw. Replace the battery if marginal and the starter motor if the current draw is beyond specification.
- Check the battery cable condition. Clean the battery terminals and replace corroded or damaged cables.
- Check the fuel system for proper operation. A fuel pump with insufficient fuel pressure or clogged injectors should be replaced.
- Check the engine's tune-up status. Note the tune-up specifications and check for items such as severely worn spark plugs; adjust or replace as needed. On vehicles with manually adjusted valve clearances, check for tight valves and adjust to specification.
- Check for a failed coolant temperature sensor, and replace if out of specification.
- heck the operation of the engine management systems for fuel and ignition; repair or replace failed components as necessary.
Engine is difficult to start when hot
- Check the air filter and air intake system. Replace the air filter if it is dirty or contaminated. Check the fresh air intake system for restrictions or blockage.
- Check for loose or deteriorated engine grounds and clean, tighten or replace as needed.
- Check for needed maintenance. Inspect tune-up and service related items such as spark plugs and engine oil condition, and check the operation of the engine fuel and ignition management system.
